#1
Catalogue tools
Description
This tutorial explains how to create and modify classes, such as motors, relays, PLCs, cables, locations, etc.
Topics Covered
Class, root, class icon, class properties, property type, list type, modify class, create class, create a new property, edit manufacturers list
Video Version
NOTE: This tutorial video was created using an older version of SkyCAD.
Ribbon buttons' appearance and positions may differ if you're using version 1.3.25 or higher.
Thank you for your patience while we update this tutorial.
Related Tutorials
- Creating/modifying symbols and blocks (6:36)
- Assigning part numbers (2:23)
- Creating/modifying catalogue parts (4:49)
Written Version
Introduction
Classes are used to distinguish different types of elements, such as motors, relays, PLCs, cables, transformers, and even locations.
In a project you may have many motors of different sizes, types, speeds and part numbers.
Regardless of those differences, they all belong to the Motor class.
When you double-click a symbol on a sheet or explore the properties of an element in the tree view, all the properties displayed exist in that element’s class.
For example, if you expand the properties of a project, its properties are listed:
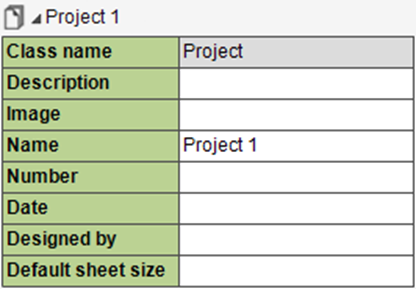
The Class name property indicates to which class the element belongs.
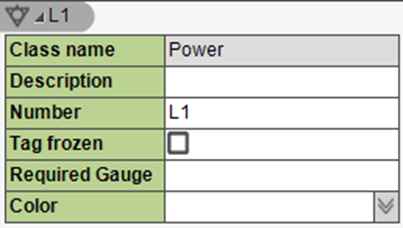
Similarly, if a Power Connection is inserted onto a sheet, double-clicking it will display its properties and Class name mentions that power connections belong to the Power class.
Opening a class
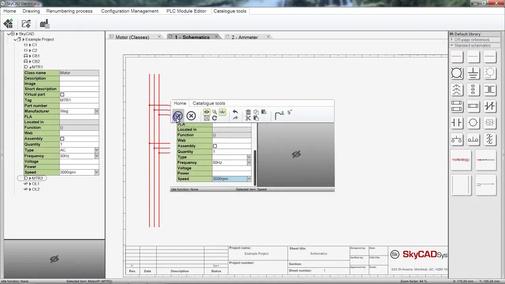
To modify the properties of a class or create new properties, the class must be opened.
To open a class, go to the Catalogue Tools tab and select Open Catalogue Class.
(If you don’t see the class you’re looking for, go to the Show tab and select ClassList to see the extended list of classes.)
Choose the desired class and click OK to open it.
Class settings
Once a class is opened, you will likely see at least four settings:
Name: The name of the class
Description: An optional description which can be added to the class
Root: Used in numbering formats in IEEE and Australia/New Zealand setups
IEC Root: Used in numbering formats in IEC setups
For the Motor class, the Root is MTR and the IEC Root is M.
This means if you have an IEEE or Australia/New Zealand setup, your motor names will have MTR in them, but if you have an IEC setup, your motor names will have M in them.
Any changes you make to these settings will affect past, present and future elements associated to that class.
Adding settings
If you don’t see one of these setting, you could add it if you wish: select the class, go to the Create/Add tab and select Add Setting. Choose the desired setting and click OK.
Class properties
Below the class settings class properties are listed in a table format.
The columns are the settings of the properties. The property settings are:
Name: The name of the property
Type: The type of property. Defines type of information allowed. Common options are:
Text: Text, including intelligent text (queries) which can return desired information
Integer: A whole number, including zero
Decimal: A non-whole number
Currency: Monetary value
Date: Date, formatted in your computer’s date format
File: The path of a file available to your computer
Directory: The path of a directory folder available to your computer
Color: A color, chosen from SkyCAD’s color palette
Boolean: A checkbox
Measurement: A length of measurement. The Units property in the SkyCAD properties will determine the unit of measurement. Decimals places are fixed.
Angle: An angle in degrees
Link: A weblink to a URL
Image: An image available to your computer
List Type: The desired behaviour of the drop-down menu
None: No drop-down menu
Proposed: Users can choose an option in the drop-down menu or enter a different value
Forced: Users must choose an option in the drop-down menu
List: The list of options in the drop-down menu. Hit Shift+Enter to start typing on a new line for a new option. The following Types can have drop-down menus: Text, Integer, Decimal, Measurement, Angle.
Initial value: The initial value of this property. Doesn’t affect existing objects which have this property. Only affects new objects which will have this property.
Force initial value as default value: Checking this setting applies the Initial Value onto all existing objects all throughout SkyCAD (across all projects, systems, parts, etc.) if that property value has not been edited previously. If it has been edited previously, it will remain unchanged.
This setting is hidden by default. Follow this tutorial, starting at 0:35.
Properties can be re-arranged by clicking and dragging.
Properties appear as columns in parts lists, BOMs and other reports which list the elements to which the properties belong.
Sometimes those columns will be hidden, but they can be unhidden.
Adding properties
To add a property, go to the Catalogue Tools tab and select Create property definition.
New properties will appear on past, present and future objects which belong to this class or a sub-class of this class.
For example, the Component class is the parent class of many sub-classes, including circuit breaker, PLC, motor, button, etc.
If you add a property to the Component class, all sub-classes will inherit that property too.
The Work Field Classes class is the parent class of the Component class, as well as the following classes, which are not children of the Component class; Project, System, Location, Terminal Strip, Accessory, Terminal Strip Element (terminals, end stops, etc.), Rail, Wire Duct, and more.
Manufacturers list
All components have a Manufacturer property as a drop-down proposed list.
To edit the list of proposed manufacturers:
Go to the Catalogue Tools tab and select Edit manufacturers list
Double-click in the Values property to start editing
Click in the list to place the cursor
To start typing on a new line, hit SHIFT+ENTER
Creating a class
To create a new class go to the Catalogue Tools tab and select Create class.
This will create the class as a sub-class of the Component class.
To create a new class as a sub-class of a different class (perhaps you want it to be a sub-class of the PLC class instead of the Component class):
Go to the Catalogue Tools tab and select Open catalogue class
Select the desired parent class (if you don’t see it, go to the Show tab and select ClassList to see the expanded list of classes)
Go to the Create/Add tab and select Create sub-class
Name it and click OK
Click the arrow beside the parent class to expand the list of sub-classes under it. You should see the new sub-class there
Select the new class and click OK to open it so you can customize it as you wish (you will likely want to add the Root setting; see Class Settings sub-section above)